How to Start a Backyard Fire Pit Area for Cozy Evenings
By the QuiteRecipes team (Jamy & Kaïna)
A backyard fire pit turns cool nights into an event. Choose the right pit, place it safely, and set up seating that makes people stay until midnight.
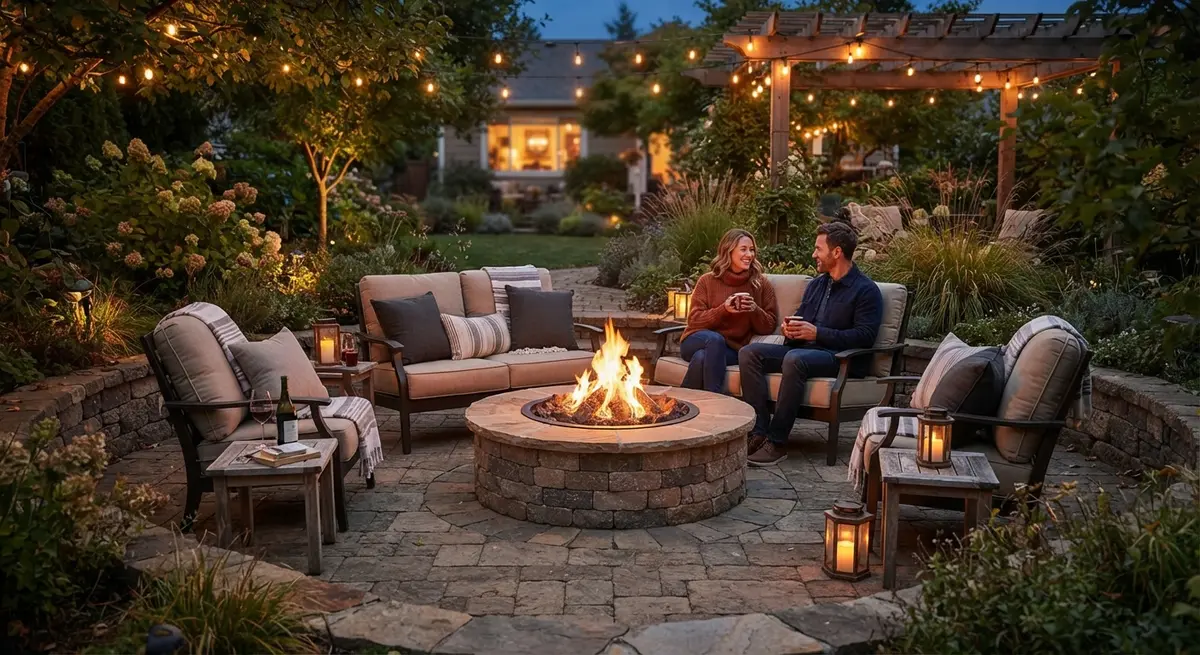
I once hosted a fire pit evening with a $40 bowl I'd bought at a big-box store, placed four feet from the fence, and lit with the wrong fuel. The flames looked gorgeous for about twenty minutes, then the cheap metal buckled, the smoke drifted straight into my neighbor's kitchen window, and we spent the evening apologizing more than toasting marshmallows. I loved the ritual of the fire pit; I'd just skipped every bit of the planning.
That's the real lesson of the fire pit: it's as much a project of placement, fuel, and seating as it is of flame. Done right, a fire pit is the cheapest pivot your backyard can make, turning September-to-April evenings from "too cold to hang outside" into the place everyone gravitates toward. My own backyard now has a sturdy steel pit on a stone pad, ringed by six chairs, and we roast, talk, and cook over it deep into the fall.
Here's exactly how to build a fire pit area that's safe, cozy, and worth using every single week.
Choose the Right Fire Pit for Your Backyard
The pit is the heart, and the right one depends on whether you want quick convenience or the ritual of real wood smoke. Nearly every backyard cookout area can host one of the main three types.
- Wood-burning fire pit (bowl or chiminea): the classic. Real fire, real crackle, real smoke, $80 to $300 for a good steel bowl, and it needs a 20-minute burn-down before it's truly cozy.
- Portable propane or gas fire pit: turn a dial and you have flame in 30 seconds, no smoke, no ash, $150 to $400, and it's allowed in many places where wood fires are banned.
- In-ground or built-in fire pit: a permanent masonry or metal-lined hole, $300 to $800 to DIY plus stone, ideal if you commit to the space for years.
My honest recommendation for a first-timer is a quality wood-burning bowl with a spark screen and a poker. The real fire is half the appeal, and it sets the mood better than any dial-lit flame ever will. Add a propane tabletop unit later only if you need instant warmth.
Place It Safely: Rules That Matter More Than Looks
Safety is the entire argument for placement, and the classics hold for a reason. Fire pits need clearances you can measure while you pour the pad.
- The 25-foot rule: keep the pit at least 10 to 25 feet (3 to 8 meters) from structures, fences, and overhanging branches, and always check local rules.
- Level, non-flammable base: stone, gravel, tile, or a metal pad; never directly on grass or by a down slope that carries embers.
- Spark screen and tools: a mesh cover, a poker, and a fire extinguisher or full hose within reach, every single time.
- Wind check: place the pit so prevailing wind carries smoke away from the house and neighbors, ideally downwind of seating.
- Clear the overhead: check for low branches and awnings; err on the side of open sky.
A neighbor's fence fire is a lesson you learn once, so I budgeted double the clearance I thought I needed and made it a rule nobody argues with. The view from six chairs around a safe ring is worth far more than the few feet of smug extra yard.
Build the Sit-Down Zone Around the Flame
A fire pit without seating is a bonfire you can only stand around, so the chairs are the second half of the space. Arrange seating in a loose circle, angled slightly toward the fire and one another, with enough room that nobody knees anyone while reaching for s'mores.
- Chairs: 6 to 8 around a standard 30 to 36 inch (75 to 90 cm) pit, set 3 to 4 feet (90 to 120 cm) from the edge.
- Materials: weather-proofed wood, Adirondack chairs, or stackable steel with cushions; all handle a season outdoors.
- The extras: a small side table for drinks, low blankets, and a waterproof basket of marshmallow forks.
- Barrier or rim: a low stone or gravel ring protects the grass and keeps stray feet and logs in line.
- Lighting: a soft lantern or string light so you can move around after the fire dims, without washing out the flame.
The design secret that changed my evenings was the 4-foot distance. Get the chairs that close and everyone leans into the heat and the conversation; stretch the ring wide and half the group shivers at the edges. Use the 4-foot (120 cm) rule.
Fuel, Timing, and the Art of a Good Burn
Fuel and patience decide whether your fire crackles or sulks. Wood burns in three stages, and impatient people pour on starters and lighter fluid and get a towering, smoky mess. Learn the sequence and the pit becomes effortless.
- Fuel wood: dried, seasoned hardwoods like oak, hickory, or maple, cut at least 6 months and ideally a year in advance.
- The pyramid build: crisscross kindling over a wad of newspaper, add small branches, light, and add bigger fuel as it catches.
- Give it 20 minutes before declaring it a failure; a hearth fire takes time to build a coal bed.
- No lighter fluid: it flavors your food and your clothes; a chimney starter or a few firelighters do the job cleanly.
- The dying fire: let it burn down to ash, then soak the coals with water and stir; never leave it until morning.
The "flare-fast, die-fast" fires of my early years came from one mistake: wet wood. A $100 season of seasoned hardwood lasts months, burns clean, and doubles the number of cozy evenings you actually create.
Cook Over the Fire to Make It a Destination
A fire pit becomes a fixation the moment you cook on it, and the great news is you don't need special equipment. Roast, toast, and bake over the embers, not the flame, and the whole family gravitates to the pit by sunset.
- S'mores and marshmallow roasting: skewer on long forks and turn slowly over red coals, the classic, and it works in minutes.
- Foil-packet dinners: vegetables, chicken, and seasonings wrapped in foil and nestled at the coal edge cook in 25 to 40 minutes.
- Grill grates: a simple grate set across the pit transforms it into a real cooking surface for steaks and vegetables.
- Cast-iron frying: keep a skillet by the pit for campfire eggs, corn, or a pot of beans over the coals.
- Hot dogs and corn: skewered or wrapped, they toast fast over the first steady coals.
The moment my backyard pivot happened was the first foil-packet dinner: chicken thighs, potatoes, and rosemary, buried near the coals while we sat around and told stories. The fire stopped being lawn decor and turned into dinner theater, and everyone, kids included, started claiming the pit for their evenings.
Weatherproof Your Fire Pit Area for All Seasons
A fire pit is a four-season investment if you build for it. Rain, cool nights, and burns all get managed with a few simple habits, so the pit is ready the instant a cool evening arrives.
- Protection: a fitted metal or canvas cover keeps rain and animals out of the bowl.
- Cool-night comfort: keep a stack of camp blankets and a small windbreak or privacy screen; it blocks the wind that chills a circle fast.
- Seasonal maintenance: clear ash after every use, and scrub the rust off metal pits each spring before coating with high-heat paint.
- Cool-season plan: in fall and winter, pull the chairs inside and store cushions; the pit stays put, covered, until warm weather returns.
- Lighting for safety: the path to the pit needs a light in winter, so guests don't trip in the dark with a marshmallow stick.
A cover is the single highest-value accessory I own. One rainstorm without it and the bowl fills, the coals soak, and your next fire is a smoky, sizzling mess. Cover it, and it's ready the night of the season's first chill.
FAQ
Is it legal to have a fire pit in a backyard?
In many cities and HOAs it depends on rules: distance from structures, burn bans, and fuel type. Check local regulations before you buy.
What's the best budget for a first fire pit area?
A quality wood-burning bowl with a spark screen and poker runs $80 to $300. Add gravel, seats, and a cover, and a complete setup lands around $400 to $600.
How far should a fire pit be from a house or fence?
At least 10 to 25 feet (3 to 8 meters), and more in dry or windy conditions. Follow local codes as the floor.
Wood or propane for a backyard fire pit?
Wood for the classic ritual and ambience, with a 20-minute burn-down. Propane for instant heat with no smoke or ash, and it's often allowed where wood is banned.
How do I cook safely over a backyard fire?
Cook over the red coals, not the open flame; use long skewers or grates, keep a fire extinguisher and water nearby, and never cook over lighter fluid.
Key Takeaways
- Choose between wood, chiminea, and gas based on ritual versus instant convenience, starting with a quality wood-burning bowl.
- Place the pit 10 to 25 feet from structures on a level non-flammable pad with a screen and extinguisher handy.
- Ring it with 6 to 8 chairs set about 4 feet from the edge, angled toward the fire and each other.
- Use seasoned hardwood, build the pyramid, give the fire 20 minutes, and skip lighter fluid entirely.
- Cook over the coals with skewers, grates, and foil packets to make the pit a weekly destination.
- Cover the pit, clear ash, and maintain chairs and rust-proofing to keep the space cozy all four seasons.
A Final Word
The buckled cheap bowl taught me that a fire pit area is built, not bought: the right pit, safe placement, a circle of chairs, and seasoned wood turns a corner of the yard into the room everyone wants to be in. On the first cool evening of the year, light it, pull the blankets close, and let the longest conversations of the season happen around your fire.
Published on 2026-08-13 by the QuiteRecipes team (Jamy & Kaïna).
Related Articles
5 Simple Ways to Be a More Gracious and Relaxed Dinner Host
Gracious hosting isn't about fancy food. It's five repeatable habits that calm the room — and you.
Bringing Vacation Home: How to Recreate Food Memories in Your Own Space
You can't bring the trip back, but you can bring its flavors. Here is how to turn travel food memories into weeknight meals in your own kitchen.
Composting at Home: A Beginner's Guide to Turning Scraps into Gold
Composting is the easiest way to turn food waste into garden gold. Start with a bin, learn the green-to-brown ratio, and watch it work.
Creating a Cozy Reading Nook Right Next to Your Dining Area
Create a cozy reading nook beside your dining area without a redesign. Find the right corner, lighting, and chair for under $150.
About the Authors
This recipe and guide was developed, tested, and approved in our home kitchen and daily life. Jamy is a retired Food Service District Manager and Early Childhood Program Manager who spent his career overseeing multi-site restaurant operations, large-scale culinary production, and daycare menu management. Kaïna brings the ultimate real-world test: making sure it brings ease and joy to our kids on a busy weeknight.
Read more about our professional background and philosophy →