Tablescape Basics: How to Dress Up Your Dining Table
By the QuiteRecipes team (Jamy & Kaïna)
A beautiful dining table doesn't require a big budget. These tablescape basics turn everyday dishes into a memorable tablescape in minutes.
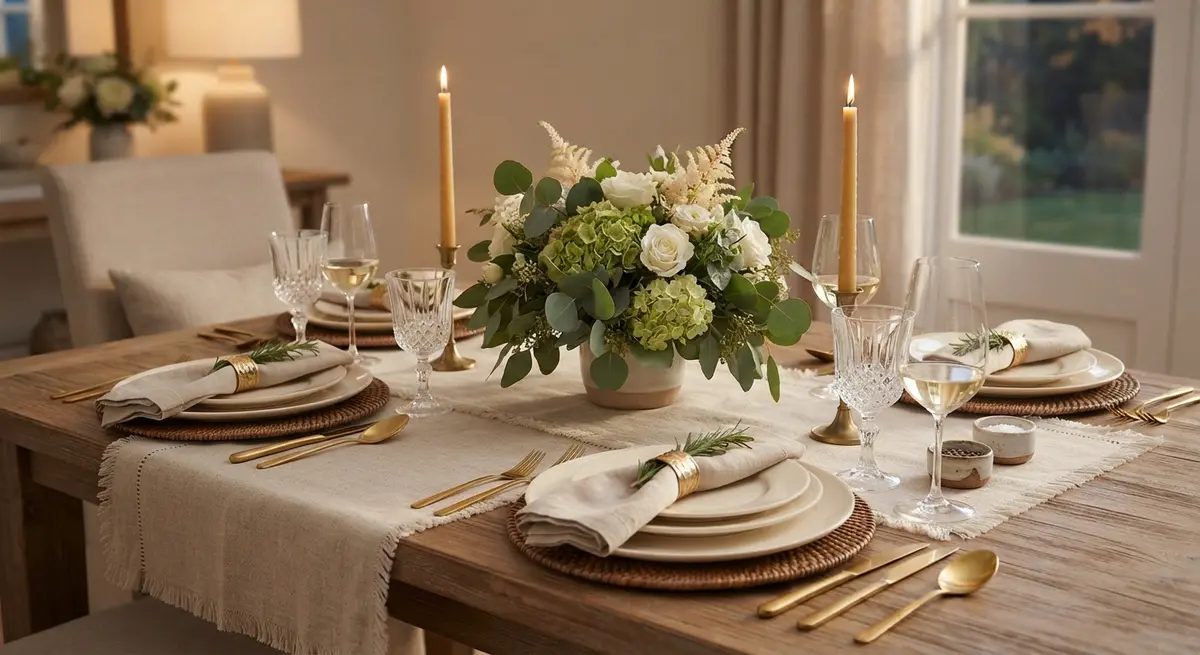
The first time I understood the power of a good tablescape, I was standing in a candlelit dining room in Lyon, watching a stranger's untouched bread plate. The table had cost nothing special—I recognized the budget charger plates from a home goods chain—but someone had layered them with crisp linen napkins, set matching glasses at every seat, and let a low line of flowers drift down the center seam. Half an hour later, the same room was loud with laughter. Nobody was looking at their phones. The table had made the evening. It always does.
I've hosted hundreds of meals: weeknight dinners with paper napkins, holiday marathons with twelve settings, everything between—and I've learned that a memorable table is never about money. It's about rhythm, contrast, planning, and using what you already own. In this guide I'll cover the tablescape basics I rely on every time: layers, place settings, a centerpiece that never blocks conversation, and details that make guests feel cared for. You'll be able to dress any dining table in under fifteen minutes.
Start With Layers, Not Decorations
Let me fix a common misunderstanding right away: a tablescape is not a pile of ornaments. It's a series of layers, each doing a quiet job. Think of your table as a stage. The cloth is the floor, the place setting is the set, and the centerpiece is the lighting. Every layer should support the next, and together they should push attention toward the food and the people—never toward the objects themselves.
The base: linens and runners
Your bottom layer sets the mood. A white or neutral tablecloth instantly reads as ceremony because it catches light; a colored runner on bare wood feels casual and modern. I keep both in rotation.
Practical advice I give everyone: if your table scratches easily, use a cloth or runner. If it's glass or stone, a runner is usually enough. And skip the dry-clean-only silk unless someone special is paying the bill. Cotton, linen, and cotton blends are forgiving, washable, and honestly look better slightly rumpled. Before buying, run your hand over the fabric—if it's stiff and plasticky, it will photograph badly and feel worse.
I spend about three minutes on this layer. I pull the cloth straight, let it drop evenly three to four inches below the edge, and move on. Perfectionism here is wasted energy; the rest of the table will cover for any minor sag.
The mid layer: placemats and chargers
Placemats and chargers are the workhorses of a good setting, and most people skip them because they think they're fussy. They aren't. Chargers—those wider plates sitting beneath dinner plates—do two things at once: they anchor each place setting in one block of color and they protect the table from hot dishes. I buy chargers in neutrals specifically so I can swap napkin colors by season without changing anything else.
Tight budget? Placemats do the same job for a fraction of the price. A woven seagrass mat costs a few dollars and adds texture flat cloth can't. Mixing materials—linen runner, woven mats, ceramic plates—is how professional tablescapes avoid looking sterile.
The Place Setting: Ninety Seconds to Intentional
Now the part everyone's nervous about: forks on the wrong side, butter knives in the wrong position. My secret is that waiters' rules exist so a dining crew can work fast without asking questions. At home, the only law is hospitality. Still, a few conventions make a table feel settled, and they take ninety seconds to execute.
The build order I use for a three-course dinner:
- Charger plate centered at each seat, one inch from the edge.
- Dinner plate on top of the charger.
- Salad plate or soup bowl above that, only when food arrives in it.
- Forks to the left—salad fork next, dinner fork closest to the plate.
- Knives to the right, blade facing the plate, soup spoon outside them.
- Water glass above the knife tips; wine glass above and slightly right.
- Bread plate top left, with a small butter knife across it.
For everyday hosting, drop the charger and the salad plate and keep just the essentials: dinner plate, one fork, one knife, one spoon, one glass, one napkin. Nobody at a weeknight table should feel like they're in a training video.
The napkin question
Napkins are the cheapest personality you can add to a table, and I have strong opinions: cloth, always, for anything beyond a Tuesday sandwich. Fabric napkins feel like a gift before the first course even arrives, and they're washable. I own twelve white-and-blue linen-mix napkins and use them at every occasion, formal or not.
Key tip: Set napkins with the fold facing away from the diner. An open edge toward the guest reads unfinished, and guests will instinctively spend a second refolding it—an instant you don't want at your table.
Where to put it: under the fork is my default, because it lets plate patterns show. In the wine glass is pretty but gets damp and surprises the guest reaching for water. On the plate works for a self-serve dinner. Choose one and stay consistent across every seat.
The Centerpiece: Design for Conversation, Not Symmetry
The biggest mistake I see in amateur tablescapes is a stunning centerpiece that completely blocks eye contact. If a guest has to lean sideways to see the person across the table, your centerpiece has failed, no matter how beautiful it is.
The 14-inch rule
I keep one measurement in my head: the tallest element of the centerpiece should top out at about 14 inches (36 cm) above the table—just below seated eye level. Low and long, not tall. A row of three bud vases, a long dish of citrus and herbs, or a runner of loose greenery all clear the line and let conversation flow straight over them.
Flowers without the florist
You don't need a stylist for a floral centerpiece. My routine on hosting weekends: two bunches of the least precious flower in the case—daisies, alstroemeria, whatever's on sale and seasonal. I trim stems at an angle, strip the lower leaves, and split the flowers between three vessels of different heights, clustered at the table's center. Then I build a soft, meandering line outward with spare blooms and trailing herbs. Gentle asymmetry reads as natural, which is exactly the feeling you want.
From your own kitchen
Some of my favorite centerpieces cost nothing beyond groceries:
- A wooden board with three pears, a cluster of grapes, and one rosemary sprig, flanked by candles.
- Citrus halves scattered on greenery—lemons and limes are fragrant and photograph beautifully.
- A whole seeded loaf on a board with a butter pot and serrated knife. Guests feel like they've walked into a bakery.
Key tip: Arrange the centerpiece an hour ahead, then step back and remove one element. Then remove another. The moment you worry it's "too plain," you're almost certainly done—over-styled is the default error; under-styled is the professional's move.
Candles, Light, and Why It Tastes Better in the Dark
Table lighting isn't decoration; it's flavor. Warm light softens faces, deepens shadows on food, and genuinely changes how a meal tastes. I've run this experiment repeatedly: an identical dish under a dim warm lamp is rated better than the same dish under a bright ceiling fixture. Every time.
My candle math for a table of six: two pillars per half of the table—roughly one candle per two guests, plus one on the sideboard. That's enough light pool without forcing anyone to squint. I keep pillars in smallholders low along the runner and light them only as guests sit.
Three rules I never break:
- Scent-free. Scented candles compete with the food. Smoky or herbed dishes get destroyed by the wrong candle.
- Low flames. Trim wicks to a quarter inch before guests arrive. Height is elegance.
- Never the ceiling light, even dimmed. Table-level light—lanterns, votives, a single sculptural lamp—is the whole look.
The five-minute emergency kit
You will host with an hour's notice eventually. I have. From a normal kitchen I can make a tablescape in five minutes: kitchen twine to tie a napkin over a butter knife, herbs from the crisper laid in a deliberate line, one taper in a water glass, ripe fruit from the bowl. That's a tablescape—guests won't know you spent four minutes instead of four days.
Seasonal Tablescapes: Let the Calendar Pick the Palette
I rotate neutral linens and chargers, then swap accents by season.
Spring and summer: sage, cream, terracotta. A pitcher crowded with tulips or ranunculus, small dishes of radishes in water, linen placemats with visible weave. Keep everything short—summer should feel like a picnic, not a boardroom.
Autumn: rust, ochre, deep brown, one dry leaf per setting as a place card. Low squash as vases for single blooms, walnuts and pomegranates along the runner's center, hammered metal or textured ceramic.
Winter holidays: evergreen, cream, gold. Tapers at staggered heights (varying height in a group is the pro move), greenery like spruce or eucalyptus laid flat as a runner with plates set over the tips, all below the 14-inch line.
When I fold the linens away at season's end, I tuck a rosemary sprig inside each one—it makes the next setting day feel like a small ceremony.
The Unspoken Rules: Place Cards, Comfort, and Timing
A tablescape fails one of two ways: it's overworked, or it forgets the guest. I've covered overworked. The forgotten-guest errors come down to three details.
For any seated gathering over six people, name cards are worth two minutes. They end the "where do I sit" shuffle, and they give you real control: seat two chatty people together, separate the shop-talkers, put the guest of honor mid-table. A folded paper slip works; a linen tag tied to rosemary works better.
My golden rule of hosting: the table is done before the doorbell. Once guests arrive, I want to be at the door, not at the buffet with a lint roller. So I pre-set water glasses, bread plates, and butter the night before. The only things I add after guests sit are hot plates and lit candles. You'll feel the difference the first time someone arrives early.
Each guest needs roughly 24 to 30 inches (60 to 75 cm) between the center of one plate and the next—enough to avoid elbow collisions, not so much that the room feels scattered. On a standard six-foot table, that's six comfortable seats. Resist the eighth chair; the meal will suffer more than the seating chart benefits.
Budget Upgrades That Punch Above Their Weight
Host more than twice a year? These five purchases transform a table more than anything else I've found:
- Neutral charger plates—make everyday china look curated in one move.
- A washable off-white cotton tablecloth—every season, every course.
- Twelve cloth napkins in one pattern, machine-washable. Not eight—twelve. Guests spill.
- Three bud vases in different heights. A trio reads intentional where one reads leftover.
- Pillar candles in small glass holders. Yes, they're that good.
That's the entire upgrade path. Everything else—fruit bowls, herb runners, name cards—comes from life, not a store.
The 15-Minute Sequence, With a Clock Attached
- 15 min before guests: clear the table and sweep the floor. Clutter is the enemy of elegance.
- 12 min: lay the cloth or runner and pull it smooth.
- 9 min: set chargers, plates, and cutlery in the order above.
- 6 min: add napkins, glasses, bread plates, and the water pitcher.
- 4 min: place the centerpiece, arrange it asymmetrically, step back, remove one thing.
- 2 min: trim wicks and set candles. Light nothing yet.
- 1 min: scan each side of the table and fix the two settings that are always slightly off.
- 0 min: doorbell. The table is done, and you're at the door.
Fifteen minutes total, the last two purely polish.
Odd-Shaped Tables? Here's How the Basics Bend
Not everyone has a six-foot rectangle, and that's fine.
- Round tables: one tight cluster at the exact center, not a long line—it keeps plates within reach of every seat.
- Small, narrow tables: skip placemats, keep a single runner, use a row of berries and one taper instead of an arrangement.
- Counter and bar height: lower everything a level. Bud vases against the wall, napkins in a glass beside each seat, runner along the back edge.
- Buffet or servery: move the whole ruleset to the sideboard—skirted cloth, two riser heights for dishes, a low vase at each end.
Rehearse the setup once on a Tuesday night, not on party day. The second run is twice as smooth, and the confidence carries into the meal.
Frequently Asked Questions
How many place settings do I actually need? Start with six complete settings plus one spare of each. Six covers two-thirds of entertaining scenarios, and the spare rescues spills and surprise guests.
Do I need matching china? No—deliberate mismatching is having a deserved moment. Same shape in different colors, or same color in different patterns, reads curated. Random mixes read chaotic.
Can I set a beautiful table without buying anything? Yes. One taper in a water glass, herbs from the crisper laid in a line, and properly folded napkins do most of the work.
Should I wash linen napkins every time? Yes, but warmth over harshness: cool water, mild detergent, line-dry or low tumble. Bleach destroys linen's softness fast, and treat wine and tomato stains promptly.
Key Takeaways
- A tablescape is layers, not decorations: base cloth, mid mats, plates, and a low centerpiece working together.
- Keep the centerpiece under 14 inches and asymmetric. If guests can't make eye contact, it's too tall.
- Warm, scent-free, table-level light is a flavor weapon—about one candle per two guests.
- Set everything before the doorbell; pre-set water, bread, and butter the night before.
- Budget buys in order of impact: chargers, off-white cotton cloth, twelve napkins, three bud vases, pillar candles.
- Fifteen minutes is enough—and the last two are polish.
The meal is the main event, but the table is the opening line. A great tablescape doesn't upstage the food; it clears the way for it, turning a dinner into something guests describe the next day. "That table," they'll say. "You remember the light." That's the whole trick—and now you have the fifteen-minute sequence to do it at home.
Published on 2026-08-13 by the QuiteRecipes team (Jamy & Kaïna).
Related Articles
5 Simple Ways to Be a More Gracious and Relaxed Dinner Host
Gracious hosting isn't about fancy food. It's five repeatable habits that calm the room — and you.
Game Night Snacks & Setup: How to Be the Ultimate Host
Game night lives or dies on its snacks. A host's guide to hands-free food, smart setup, and friendly rules.
How to Curate the Perfect Dinner Party Playlist for Any Vibe
The dinner party playlist is a hosting skill. Learn volume math, tempo curves, and a no-fail structure.

How to Pair Wine with Dinner When You're Not a Sommelier
Wine pairing isn't rocket science. Learn the three simple matches that work for home dinners.
About the Authors
This recipe and guide was developed, tested, and approved in our home kitchen and daily life. Jamy is a retired Food Service District Manager and Early Childhood Program Manager who spent his career overseeing multi-site restaurant operations, large-scale culinary production, and daycare menu management. Kaïna brings the ultimate real-world test: making sure it brings ease and joy to our kids on a busy weeknight.
Read more about our professional background and philosophy →