How to Season and Maintain Wooden Cutting Boards
By the QuiteRecipes team (Jamy & Kaïna)
A wooden board isn't fragile — it's forgiving, but not to neglect. With a simple oil-and-wax routine and a few honest habits, yours will stay gorgeous and safe for years.
The first wooden board I bought was a cheap maple rectangle from a big-box store. I treated it like a cutting surface and nothing more — the way most of us do. Within eleven months it was warped, cracked at one end, and faintly gray in the middle. I threw it out convinced that wood boards were a hassle. Then an old chef taught me the truth: I wasn't maintaining a board, I was abusing it.
Wooden boards weren't the problem. My ignorance was. Once I learned how to season, clean, and store a board properly, my next one lasted through eight years of daily chopping — including a marriage, two moves, and roughly ten thousand onions.
This guide is everything I wish someone had told me that first time: why wood is worth defending, what oil and wax actually do, how to clean without wrecking the surface, and how to rescue a board that's already dry, cracked, or smelly.
Why Wood Is Worth the Effort
Plastic boards are easy, and I still own one for raw chicken. But for almost everything else, wood wins.
Wood is naturally self-healing. Knife cuts close back up over time, which means fewer deep grooves for bacteria to hide in. Plastic, by contrast, accumulates permanent scars that are nearly impossible to sanitize once they're deep. Multiple studies have shown seasoned wood boards harbor fewer lingering bacteria than scarred plastic ones after equivalent cleaning. That counterintuitive fact is one of the quieter reasons professional kitchens reach for wood.
Wood is also kind to knives. The end-grain boards especially let the blade sink slightly and then hold; your edge stays sharper, longer, because nothing in the kitchen blunts a knife faster than a hard surface.
And wood just looks warmer. A cared-for board becomes the centerpiece of the counter — the thing you wipe, oil, and show off when friends visit.
Key insight: A wooden board isn't furniture you cut on. It's a tool you maintain the way a guitarist maintains a guitar. The care is the point.
What "Seasoning" Actually Means
Seasoning a board sounds mysterious. It isn't.
When wood is milled into a board, it's still a sponge. The fibers take in and release moisture constantly. Untreated wood will absorb liquids from your food, dry out, and crack at the end grain. It will also bow and warp as one side dries faster than the other.
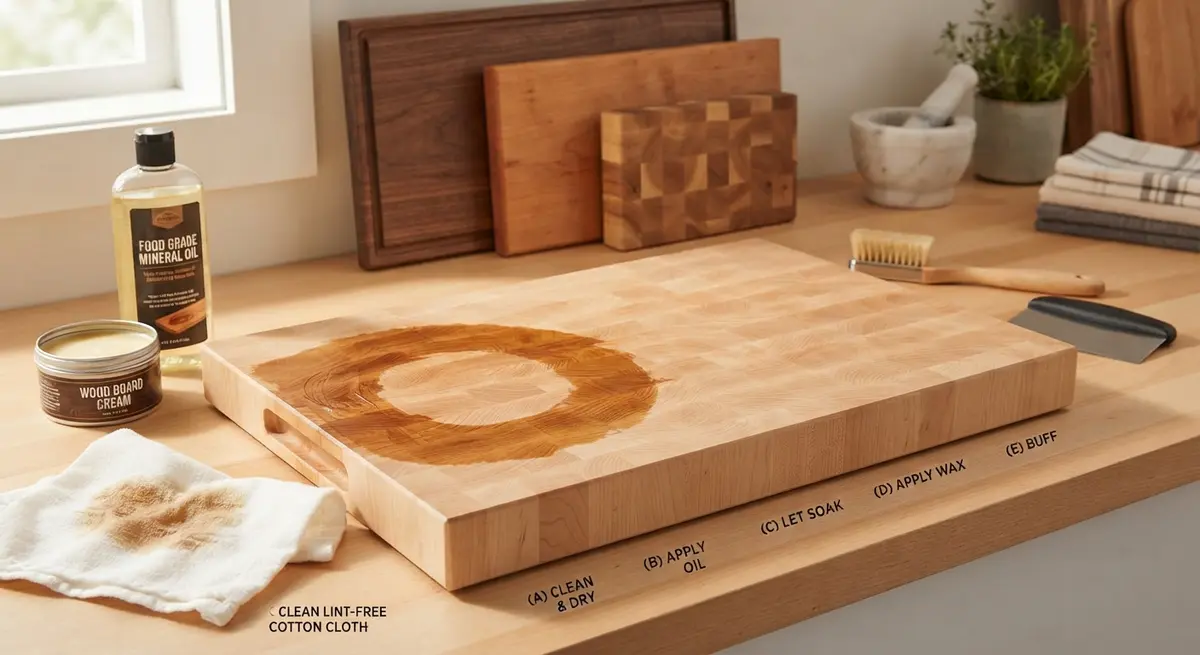
Seasoning means filling those fibers with a protective food-safe barrier: oil and beeswax, applied in thin layers, allowed to soak in, and repeated on a schedule.
The goal isn't a thick coat. It's saturation — wood that drinks less, dries slower, and resists bacteria.
Let me be blunt about oils, because there's a lot of bad advice online.
What to Use
- Mineral oil is the gold standard. It's colorless, odorless, tasteless, never goes rancid, and is food-safe. It's the oil almost every professional recommends, and it's cheap.
- Fractionated coconut oil is a fine alternative. It stays liquid at room temperature and shares mineral oil's non-rancidity.
- Beeswax-paste conditioners are ideal for the final coat. A 4-to-1 blend of mineral oil and beeswax gives a water-resistant, velvety finish that seals better than oil alone.
What Not to Use
- Vegetable, olive, and canola oil — they go rancid. Old rancid oil layers smell, turn sticky, and can make your food taste like a damp basement.
- Drying oils like linseed or tung oil are great for furniture. They are not all food-safe, and the "food-safe" versions still require long curing times that are a headache in the kitchen.
The rule of thumb: if an oil is intended for a salad, keep it off your board. Use oil intended for cutting boards.
The First Seasoning: Starting Fresh
If a board is brand new, or has been unloved for a long time, give it a proper first treatment:
- Sand lightly if needed. If the surface feels rough or has raised grain, pass over it with 220-grit sandpaper in the direction of the grain. Wipe the dust off with a damp cloth.
- Apply mineral oil generously. Pour a palm-sized amount on the surface and spread it with a clean lint-free cloth or paper towel. Don't drown it — a film is enough.
- Wait. Let the oil soak for two to four hours, or overnight for a board that's especially dry. Reapply if the surface looks thirsty.
- Apply a wax coat. Once the oil is absorbed, rub in a thin layer of mineral-oil-and-beeswax paste. Let it sit for twenty minutes, then buff with a dry cloth.
- Repeat until it stops absorbing. A healthy new board will soak up two or three rounds before it's saturated.
The test: after buffing, the board should feel smooth, slightly soft, and show no dry gray spots. Water droplets should bead slightly rather than soak in instantly.
Daily Cleaning Without Wrecking the Wood
This is where most boards die. Here's the routine I've used for thousands of meals.
- Wipe after each use, don't soak. Remove food debris immediately. Then wash with hot water and a mild dish soap, quickly. Exposure to soapy water isn't the enemy; prolonged soaking is.
- Never soak a wooden board in the sink. Even twenty minutes in water makes the end grain swell. Repeated swelling opens cracks and warps the board.
- Wipe dry immediately. Standing water on a wet board is a bacterial invitation. Dry it with a clean towel and, ideally, air-dry it standing upright so air reaches both faces.
- Use plastic or a quartered board for raw meat. I keep one plastic board strictly for poultry and raw proteins. Wood can be sanitized, but plastic is simpler for the riskiest jobs.
The Deep Clean
Once a week, or anytime the board smells or feels greasy, do a little more:
- Salt-and-lemon scrub: sprinkle coarse salt over the surface, cut a lemon in half, and use it like a sponge. The salt grinds away food residue; the citric acid breaks down odor molecules and lightens stains. Rinse, dry, oil lightly.
- Baking soda paste for stubborn smells: mix baking soda with water to a thick paste, spread it on, wait ten minutes, scrub with a sponge, rinse, dry.
- Hydrogen peroxide (3%) for the rare case of actual food poisoning risk: wipe the board, let it sit for a few minutes, rinse thoroughly, dry.
Avoid the dishwasher entirely. Heat, moisture, and detergent in a dishwasher will crack, warp, and strip a wooden board faster than any mistake you can make by hand.
The Oil Schedule That Keeps a Board Alive
How often? It depends on how much the board works and where you live.
A board used daily in a dry climate wants oiling every one to four weeks. One that's used a few times a week can go a month or two. The real signal is appearance: if the wood looks pale, dry, or water no longer beads, it's thirsty.
The simple routine I practice:
- After every major clean, I apply a thin mineral oil coat and wipe off the excess after thirty minutes.
- About once a month, I do the full oil-and-wax treatment.
- Every six months, I check the surface for roughness and re-sand lightly if needed, then reseason.
The signal test: place a few drops of water on the surface. If they soak in within a minute rather than beading, your board is dry and ready for oil.
Rescuing a Board That's Already Rough
If you've inherited a gray, cracked board, don't throw it away. You can usually bring it back.
- Wash and dry it thoroughly.
- Sand it with 120-grit, then 220-grit, then 400-grit, working through the gray, stained outer layer until the wood looks fresh. This is satisfying and fast.
- Wipe away the dust with a damp cloth and let it dry completely.
- Season it aggressively — two or three rounds of oil with overnight soaks between.
- Finish with a wax coat and buff.
Small hairline cracks often close up once the board is properly hydrated. A board that is genuinely split end-to-end may need glue-and-clamp surgery, which is a longer project for another day — but for most boards, sanding and oiling restores ninety percent of the former glory.
Storage and Location Habits
Where you keep the board matters as much as what you put on it.
- Store it standing upright, not flat, so air circulates and both faces dry evenly.
- Keep it away from the stove, oven vent, and radiator. Constant heat dries out wood fast and accelerates cracking.
- Never trap it against a wall in a wet state. Give it space to breathe.
- Use both faces regularly. If you always use the same face, the underside absorbs moisture unevenly and the board warps. Rotating faces keeps it flat.
Choosing a Board: End-Grain vs. Edge-Grain
Since you're going to care for it for years, the choice of board matters almost as much as the maintenance.
- End-grain boards are the professional favorite. The fibers face up, so knife cuts close back up easily and the surface "self-heals." They're softer on your knife, but heavier and pricier.
- Edge-grain boards (the classic cutting board) are tougher, cheaper, and fine for most home cooks. They dent slightly with hard use, which is normal — and re-seasoning smooths it out.
- Bamboo is technically grass, not wood. It's hard and cheap, but harder on your knives and more prone to dulling over time. Fine to own; not the best for your favorite blade.
Buy a board at least 1.5 cm thick so it won't warp under daily use, and size it to your work surface. A board that overhangs a counter edge by more than a few centimeters is a board that will find its way to the floor.
Cleaning Without Strip/Sanitizing Confusion
A common worry: "If I clean too aggressively, am I stripping the seasoning?" The truth is comforting.
- The seasoning is a layer of oil and polymerized fat that has soaked into the fibers. It lives inside the wood, not just on top.
- Washing with warm water and mild soap never removes that deep layer. It only cleans the wet surface.
- The real enemy isn't soap — it's soaking. Water is what swells fibers, opens cracks, and loosens the structure. Soap in a quick scrub is absolutely safe.
If you want extra reassurance after handling raw proteins on a wooden board (though I recommend a dedicated plastic board for those), the hydrogen peroxide wipe is my go-to: it's a known food-surface sanitizer without the suicidal severity of bleach on wood. Rinse well afterward.
The Regional Variation: Oil and Humidity
Where you live changes the maintenance math.
- In a dry climate (deserts, very cold winters with indoor heating), wood dries fast and needs oiling more often — watch for the pale, thirsty look and crack-prone edges.
- In a humid climate, wood drinks water instead of oil, and you may see the opposite: a board that seems damp, dark, or slightly musty. That's a signal to dry thoroughly, oil lightly, and store in a well-ventilated spot.
- Near a window or radiator boards suffer both extremes seasonally. Keep the board in a stable, cool, dry spot and adjust your oil interval with the season.
A board that's treated as "one size fits all" will surprise you with cracks in a dry winter or mold in a damp spring. Matching your care to your climate is the final, most personal touch.
FAQ
Is mineral oil safe to eat?
Yes. Food-grade mineral oil is non-toxic and passes through the body without being absorbed. It's the same oil approved for tools that touch food, and it never goes rancid.
Can I use olive oil on my board?
You can, but you shouldn't. Olive oil polymerizes into a sticky layer that turns rancid and smells. It also attracts dust. There are better oils made for the job, and they cost less than the olive oil you cook with.
Do wooden boards harbor more bacteria than plastic?
Not when properly maintained. Seasoned wood actually suppresses some bacteria because the cut fibers close back up. The danger comes from deep grooves and wet neglect — not from wood itself.
How do I get a garlic or onion smell out?
Rub the board with coarse salt and a lemon half, rinse, and dry. For stubborn smells, a baking soda paste or a brief hydrogen peroxide wipe does the job.
How do I spot clean without stripping the seasoning?
Skip the heavy sanding unless the surface is rough. Wipe-fry with warm soapy water, dry immediately, and re-oil a thin coat monthly. The seasoning lives under the surface — a little soap never fully removes it.
Key Takeaways
- Season wood boards with mineral oil and beeswax; never use cooking oils that can turn rancid.
- Clean hot and fast: wash with soap, dry immediately, never soak, and never dishwasher a wooden board.
- Oil when the wood looks dry; the water-bead test tells you when.
- Sand and reseason a tired board instead of replacing it.
- Store upright and away from heat; rotate faces to prevent warping.
A Final Word
A wooden board will outlive your favorite pan if you give it fifteen minutes a month. Mine did. The first board I ever bought failed because I treated it like plastic. The second one taught me the lesson I'm passing to you: care for the wood, and the wood will care for every meal you make. Start with a single oiling tonight — your knife edge and your next salad will both notice.
Published on 2026-08-13 by the QuiteRecipes team (Jamy & Kaïna).
Related Articles
How to Choose the Right Stand Mixer for Your Baking Needs
The right stand mixer survives decades of baking — the wrong one collects dust. This guide cuts through the specs: capacity, bowl, power, attachments, and the decision rule for your kitchen.

The Ultimate Guide to Descaling Your Coffee Maker
Limescale quietly ruins coffee flavor and slows brewing. Here's the chemical-free descaling routine I use at home and in professional kitchens to keep machines running like day one.
How to Sharpen Kitchen Knives at Home: A Step-by-Step Guide
Most 'dull' knives aren't dead — they just need aligning. Here's when to steel, when to sharpen, and the exact angles that bring any blade back to slicing perfection.

5 Cozy Decor Ideas to Make Your Kitchen Feel Like Home
The coziest kitchens aren't magazine spreads — they're layered light, soft textures, living green, good smells, and room to gather. These five ideas make any kitchen feel like home.
About the Authors
This recipe and guide was developed, tested, and approved in our home kitchen and daily life. Jamy is a retired Food Service District Manager and Early Childhood Program Manager who spent his career overseeing multi-site restaurant operations, large-scale culinary production, and daycare menu management. Kaïna brings the ultimate real-world test: making sure it brings ease and joy to our kids on a busy weeknight.
Read more about our professional background and philosophy →